
1.Understand the importance of verbal and written communication
Define the following terms:
communication
the process of exchanging information with others by sending and receiving messages.
verbal communication
communication involving the use of spoken or written words or sounds.
nonverbal communication
communication that does not use words.
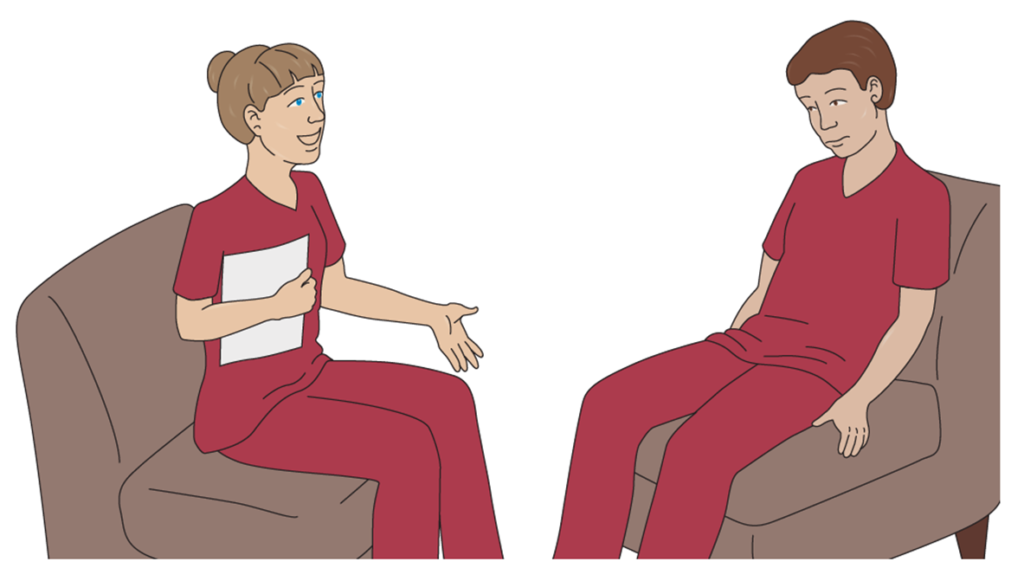
Transparency 2-1: Body Language
1.Understand the importance of verbal and written communication
Think about these questions:
Can you think of a situation where someone was sending one message with verbal communication and a completely different message with nonverbal communication?
How can an NA use observation as a form of nonverbal communication with a resident?
Can you think of an example of how an NA would use verbal or nonverbal communication to reach a specific goal?
1.Understand the importance of verbal and written communication
REMEMBER:
When caring for residents, NAs should speak in a language residents can understand or find someone who speaks the resident’s language.
Picture cards, gestures, and translation devices can help.
Do not speak a language the resident does not understand with someone else in front of the resident.
1.Understand the importance of verbal and written communication
How might an NA give an oral report of the following situations?
•Resident falls
•Resident complains of chest pain
•Resident complains of severe headache
•Resident is having difficulty breathing
•NA observes abnormal pulse, respiration, or blood pressure
•Change in resident’s mental status
1.Understand the importance of verbal and written communication
How might an NA give an oral report of the following situations? (cont’d)
•Resident experiences sudden weakness or loss of mobility
•NA finds resident has high fever
•Loss of or change in resident’s consciousness
•Resident is bleeding
•Change in resident’s condition
•Resident shows signs of abuse
1.Understand the importance of verbal and written communication
When communicating with residents the NA should
•Always greet the resident by his or her preferred name.
•Identify himself.
•Focus on the topic to be discussed.
•Face the resident while speaking.
•Talk with the resident, not other staff members, while giving care.
1.Understand the importance of verbal and written communication
When communicating with residents the NA should (cont’d)
•Listen and respond when the resident speaks.
•Use positive language and smile often.
•Encourage the resident to interact with him and others.
•Be courteous.
•Tell the resident when he is leaving the room.
1.Understand the importance of verbal and written communication
REMEMBER:
When communicating with residents it is important to use the name the resident prefers. NAs should not use residents’ first names unless the resident has asked them to do so.
As a class, discuss how it feels to be addressed by a different name or set of pronouns than those preferred.
1.Understand the importance of verbal and written communication
Define the following terms:
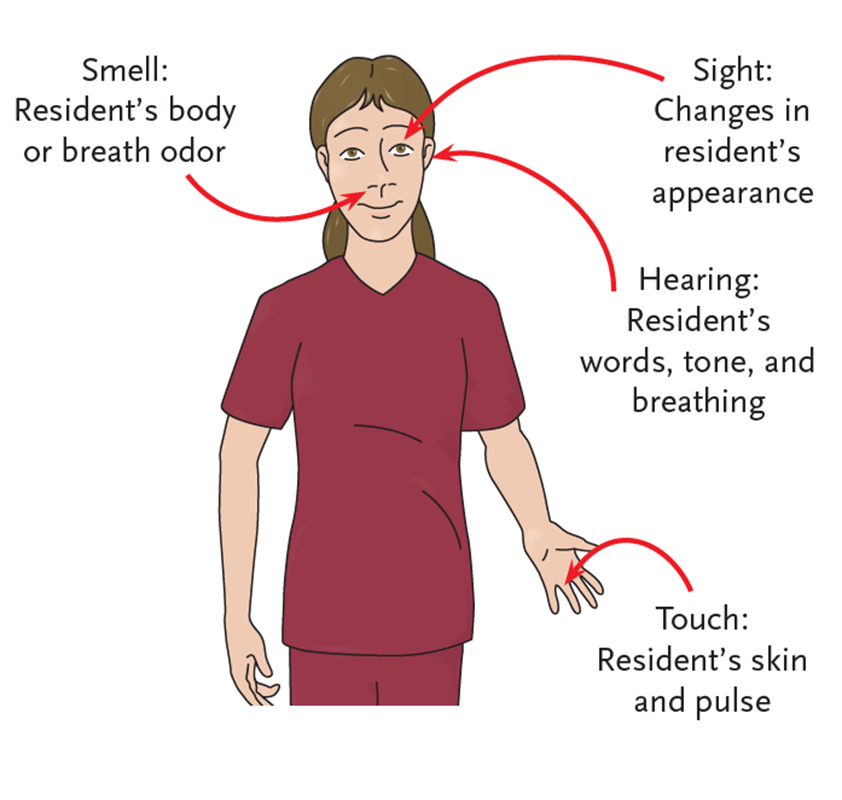
objective information
information based on what a person sees, hears, touches, or smells; also called signs.
subjective information
information that a person cannot or did not observe, but is based on something reported to the person that may or may not be true; also called symptoms.
incontinence
the inability to control the bladder or bowels.
Key Material 2-2: Using Your Senses
1.Understand the importance of verbal and written communication
Think about this question:
In what ways would it be more difficult for healthcare workers (doctors, nurses, nursing assistants, etc.) to communicate if there were no medical terminology or abbreviations?
1.Understand the importance of verbal and written communication
Nursing assistants need to remember these steps for answering the phone at work:
•Identify the facility’s name and one’s own name and position.
•Place caller on hold if need be. Write down messages. Ask for correct spelling of names. Get a number.
•Say “Thank you,” and “Goodbye.”
1.Understand the importance of verbal and written communication
REMEMBER:
It is a violation of confidentiality to give out information about staff or residents over the phone.
1.Understand the importance of verbal and written communication
Emphasize to students that answering call lights is an important part of their jobs and that all residents are the responsibility of all NAs. Discuss the importance of the ensuring the call light is within reach of the resident’s stronger hand at all times.
2.Describe barriers to communication
Define the following term:
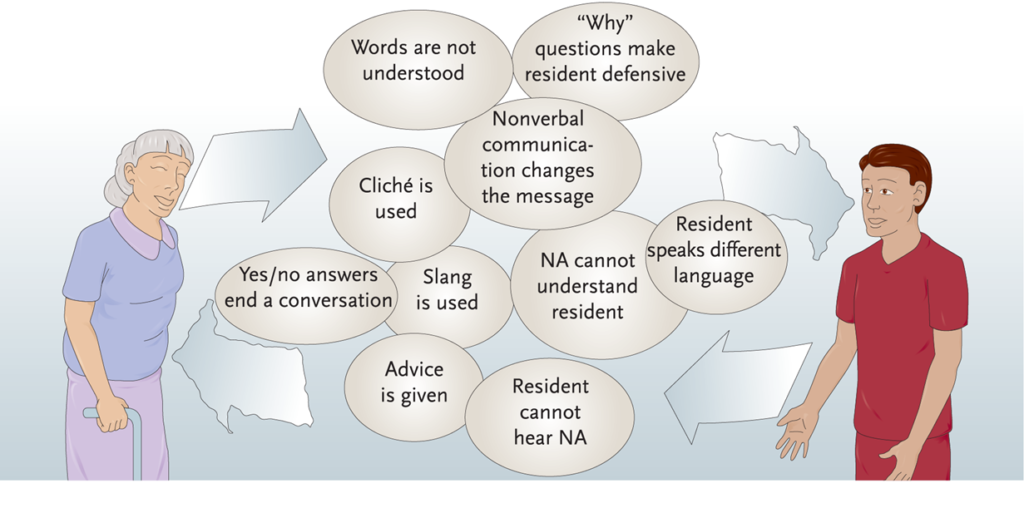
clichés
phrases that are used over and over again and do not really mean anything.
Key Material 2-3: Barriers to Communication
2.Describe barriers to communication
Think about these questions:
What are some examples of slang expressions?
Why should slang not be used when communicating with residents?
2.Describe barriers to communication
Think about these questions:
Can you imagine what life would be like without communication?
Have you ever wasted time and effort because of a miscommunication?
When has effective communication resulted in a positive outcome for you?
2.Describe barriers to communication
Define the following term:
defense Mechanisms
unconscious behaviors used to release tension or cope with stress.
2.Describe barriers to communication
All of these defense mechanisms can be barriers to effective communication:
•Denial
•Projection
•Displacement
•Rationalization
•Repression
•Regression
2.Describe barriers to communication
Define the following term:
culture
a system of learned beliefs and behaviors that is practiced by a group of people and is often passed on from one generation to the next.
2.Describe barriers to communication
Culture can influence all of these aspects of communication:
•
•Need for distance/personal space
•Level of comfort with touch
•Meaning of or desire for eye contact
2.Describe barriers to communication
Think about this question:
From your own experience, do you know of other examples of how culture influences communication?
3.List guidelines for communicating with residents with special needs
Define the following terms:
impairment
A loss of function or ability.
mental health
the normal functioning of emotional and intellectual abilities.
mental health disorder
a disorder that affects a person’s ability to function and often causes inappropriate behavior; confusion, disorientation, agitation, and anxiety are common symptoms.
combative
violent or hostile.
3.List guidelines for communicating with residents with special needs
NAs should remember the following when communicating with residents with hearing impairment:
•Make sure hearing aid is on and working. Clean hearing aid as instructed.
•Reduce or remove noise.
•Get residents’ attention first.
•Speak clearly, slowly, and in good lighting.
•Do not shout or mouth words in an exaggerated way.
•Lower the pitch of your voice.
•Keep hands away from your face while talking.
•Speak to the side with better hearing.
3.List guidelines for communicating with residents with special needs
Communicating with residents with hearing impairment (cont’d):
•
•Use short sentences and simple words.
•Repeat what was said, using different words if necessary.
•Use picture cards or notepads.
•Be patient and empathetic.
•Ask resident to repeat what was said when necessary. Observe body language.
•Be understanding and supportive.
3.List guidelines for communicating with residents with special needs
These techniques are useful in communicating with residents with vision impairment:
•Make sure eyeglasses are clean, being worn, and are in good condition. Leave contact lens care to resident if possible.
•Identify yourself when entering the room.
•Make sure there is proper lighting. Face the resident when speaking.
•Orient the resident to new areas.
•Tell the resident what you are doing. Talk directly to the resident.
•Use an imaginary clock as a guide.
3.List guidelines for communicating with residents with special needs
Techniques for communicating with residents with vision impairment (cont’d):
•Do not move items. Put anything you move back where it was found.
•Tell the resident where the call light is.
•Leave the door completely open or completely closed.
•When assisting resident with walking, walk slightly ahead, letting the resident grasp your arm.
•Give assistance with cutting food and opening containers as needed.
•Use large clocks, clocks that chime, or radios.
3.List guidelines for communicating with residents with special needs
Techniques for communicating with residents with vision impairment (cont’d):
•Offer large-print books, audiobooks, digital books, and Braille books if necessary.
•Do not play with guide dogs.
•Encourage the use of other senses.
3.List guidelines for communicating with residents with special needs
When working with residents with a mental health disorder, it’s important to remember the following:
•Do not talk to adults as if they were children.
•Use simple, clear statements and a normal tone of voice.
•Be sure that what you say and how you say it show respect and concern.
•Sit or stand at a normal distance from the resident. Be aware of your body language.
•Be honest and direct, as with any resident.
•Avoid arguments.
•Maintain eye contact and listen carefully.
3.List guidelines for communicating with residents with special needs
●
REMEMBER:
A mental health disorder is a disorder like any physical disorder. People who have a mental health disorder cannot just choose to change their behavior and be well.
3.List guidelines for communicating with residents with special needs
When dealing with combative behavior, remember these tips:
•Block blows or step out of the way.
•Allow the resident time to calm down before the next interaction.
•Give the resident space; stand at least an arm’s length away.
•Stay calm. Lower the tone of your voice.
•Be flexible and patient.
•Stay neutral. Do not respond to verbal attacks, argue, or accuse the resident of wrongdoing.
•Do not use gestures that could frighten or startle the resident.
•Be reassuring and supportive.
3.List guidelines for communicating with residents with special needs
Techniques for communicating with residents who are combative (cont’d):
•Find out what provoked the resident.
•Report inappropriate behavior.
3.List guidelines for communicating with residents with special needs
It is difficult to communicate with angry residents. These suggestions will help:
•Stay calm. Do not argue or respond to verbal attacks.
•Empathize with the resident.
•Try to find out what caused the angry reaction. Listen attentively and remain silent.
•Be respectful. Explain what you are going to do.
•Answer call lights promptly.
•Stay at a safe distance.
3.List guidelines for communicating with residents with special needs
When an NA encounters inappropriate behavior it is important to remember the following:
•Report the behavior.
•Be professional and do not overreact.
•Try distraction.
•Gently direct the resident to private area.
3.List guidelines for communicating with residents with special needs
●
REMEMBER:
An NA must never hit a resident, no matter how the resident may have provoked him. Hitting is considered abuse and may result in termination and/or legal action.
3.List guidelines for communicating with residents with special needs
●
REMEMBER:
Residents’ physical and psychological health can depend a great deal on how NAs communicate. NAs should be comforting and kind with residents, and listen if the residents want to talk.
4.Identify ways to promote safety and handle nonmedical emergencies
REMEMBER:
Prevention is the key to safety. Unsafe conditions should be reported before accidents occur.
4.Identify ways to promote safety and handle nonmedical emergencies
Define the following terms:
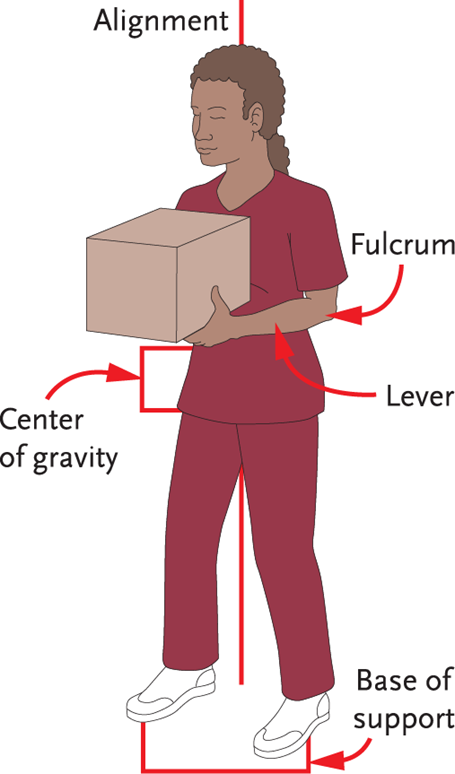
body mechanics
The way the parts of the body work together when a person moves.
posture
The way a person holds and positions his body.
Key Material 2-4: Body Alignment
4.Identify ways to promote safety and handle nonmedical emergencies
Principles of body mechanics related to alignment include the following:
•Try to keep the body in alignment, with two sides of the body mirror images of each other.
•Keep the object close when carrying or lifting.
•Point feet and body toward the direction you are moving.
•Avoid twisting at waist.
4.Identify ways to promote safety and handle nonmedical emergencies
These principles of body mechanics relate to a person’s base of support:
•Wide base is more stable.
•Stand with legs shoulder-width apart.
4.Identify ways to promote safety and handle nonmedical emergencies
NAs should remember these points about body mechanics and a person’s center of gravity:
•When standing, weight is centered in the pelvis.
•A low center provides more base of support.
•Bend your knees when lifting.
4.Identify ways to promote safety and handle nonmedical emergencies
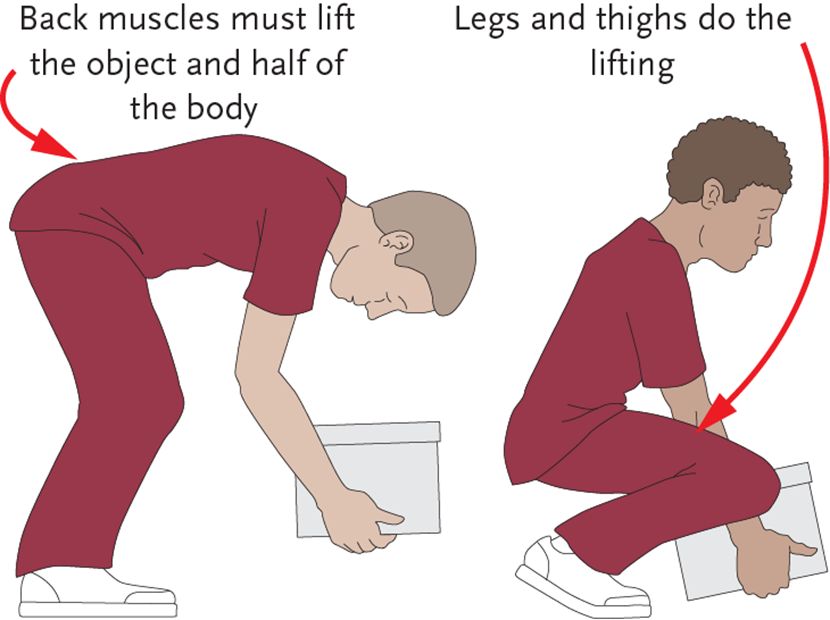
As an example of how to apply proper body mechanics, consider this method for lifting a heavy object from the floor:
•Spread feet shoulder-width apart.
•Bend your knees.
•Use the muscles in your thighs, upper arms, and shoulders.
•Hold the object close to body.
•When standing up, push with the hip and thigh muscles.
Key Material 2-5: Lifting Heavy Objects from the Floor
4.Identify ways to promote safety and handle nonmedical emergencies
Remember these guidelines for using proper body mechanics:
•Assess the situation and remove obstacles.
•Use both arms and hands to lift, push, or carry objects.
•When lifting a heavy object from the floor, spread your feet shoulder-width apart. Bend your knees. Raise your body and the object together.
•Hold objects close to you when you are lifting or carrying them.
•Push or slide objects, rather than lifting them.
•Avoid bending and reaching as much as possible.
4.Identify ways to promote safety and handle nonmedical emergencies
Guidelines for using proper body mechanics (cont’d):
•If you are making a bed, adjust the height to a safe working level, usually waist high.
•When a task requires bending, use a good stance. Bend your knees to lower yourself, rather than bending from the waist.
•Avoid twisting at the waist when you are lifting or moving something. Instead, turn your whole body. Your feet should point toward what you are lifting or moving.
•Get help from coworkers when possible for lifting or helping residents.
4.Identify ways to promote safety and handle nonmedical emergencies
Guidelines for using proper body mechanics (cont’d):
•Talk to residents before moving them. Agree on a signal. Lift or move on three.
•To help a resident sit up, stand up, or walk, place your feet shoulder-width apart. Place one foot in front of the other, and bend your knees.
•Never try to catch a falling resident. If the resident begins to fall, assist her to the floor.
•Report to the nurse any task that you feel you cannot safely do.
4.Identify ways to promote safety and handle nonmedical emergencies
Define the following terms:
fracture
a broken bone.
disorientation
confusion about person, place, or time.
scalds
burns caused by hot liquids.
abrasion
an injury that rubs off the surface of the skin.
4.Identify ways to promote safety and handle nonmedical emergencies
Falls may be caused by
•Unsafe environment
•Loss of abilities
•Disease
•Medication
•Loss of vision
•Gait or balance problems
•Weakness
•Paralysis
•Disorientation
4.Identify ways to promote safety and handle nonmedical emergencies
Falls can be prevented in these ways:
•Clear walkways.
•Use nonskid rugs.
•Have resident wear nonskid shoes.
•Have resident wear clothing that fits.
•Keep frequently used personal items close.
•Answer call lights promptly.
•Clean up spills.
•Report loose hand rails immediately.
4.Identify ways to promote safety and handle nonmedical emergencies
Falls can be prevented in these ways:
•Clear walkways.
•Use nonskid rugs.
•Have resident wear nonskid shoes.
•Have resident wear clothing that fits.
•Keep frequently used personal items close.
•Answer call lights promptly.
•Clean up spills.
•Report loose hand rails immediately.
4.Identify ways to promote safety and handle nonmedical emergencies
Falls can be prevented in these ways:
•Clear walkways.
•Use nonskid rugs.
•Have resident wear nonskid shoes.
•Have resident wear clothing that fits.
•Keep frequently used personal items close.
•Answer call lights promptly.
•Clean up spills.
•Report loose hand rails immediately.
4.Identify ways to promote safety and handle nonmedical emergencies
Fall prevention (cont’d):
•Mark hazardous areas.
•Improve lighting.
•Lock wheelchairs.
•Lock bed wheels.
•Return beds to lowest positions.
•Get help.
•Offer toileting assistance and respond to requests promptly.
•Leave furniture in the same place.
•Pay attention to residents at risk for falls.
•Never try to catch a falling resident.
•Report falls/Always complete incident report
4.Identify ways to promote safety and handle nonmedical emergencies
Burns and scalds are caused by
•Dry heat (irons, stoves, other electrical appliances)
•Wet heat (hot water or other liquids, steam)
•Chemicals (lye, acids)
4.Identify ways to promote safety and handle nonmedical emergencies
To help prevent burns and scalds NAs can do the following:
•Check water temperature.
•Report frayed cords.
•Communicate about hot liquids.
•Pour hot drinks away from residents.
•Keep hot drinks away from edges of tables. Use lids.
•Make sure residents are sitting before serving hot drinks.
•Monitor heat-producing equipment.
4.Identify ways to promote safety and handle nonmedical emergencies
To prevent accidents resulting from not identifying residents properly, NAs should always
•Identify each resident before care or feeding.
•Check IDs.
•Call the resident by name. Ask the resident to state his name.
4.Identify ways to promote safety and handle nonmedical emergencies
REMEMBER:
Not identifying residents before giving care or serving food can cause serious problems or even death.
4.Identify ways to promote safety and handle nonmedical emergencies
Choking is a greater risk when residents are
•Weak
•Ill
•Unconscious
4.Identify ways to promote safety and handle nonmedical emergencies
NAs can help prevent choking by
•Making sure residents eat in an upright position
•Following orders for special diets and thickened liquids
•Thickened liquids are easier to swallow
4.Identify ways to promote safety and handle nonmedical emergencies
Poisoning occurs when a person ingests a harmful substance. It may be prevented by
•Storing harmful substances carefully
•Not leaving cleaning products in rooms
•Investigating any unusual odors
•Post Poison Control Center number
4.Identify ways to promote safety and handle nonmedical emergencies
To help prevent cuts and abrasions, NAs should do the following:
•Put sharp objects away after use.
•Push wheelchairs forward.
4.Identify ways to promote safety and handle nonmedical emergencies
NAs play an important role in a facility’s fire safety. They must
•Make sure smokers are in proper area for smoking. Never leave smokers unattended. Make sure ashtrays do not contain hot ashes before emptying them. Use burn-resistant aprons properly and as instructed.
•Follow instructions for e-cigarettes.
•Report frayed or damaged cords.
•Report if fire alarms and exit doors are blocked.
4.Identify ways to promote safety and handle nonmedical emergencies
For fire safety, NAs should (cont’d):
Know how to use fire extinguishers:
•Pull the pin.
•Aim at the base of fire when spraying.
•Squeeze the handle.
•Sweep back and forth at the base of fire.
In case of fire at a facility, use RACE:
•Remove residents from danger.
•Activate alarm or call 911.
•Contain fire if possible.
•Extinguish, or fire department will extinguish.
4.Identify ways to promote safety and handle nonmedical emergencies
For fire safety, NAs should (cont’d):
•
•Know the evacuation plan.
•Stay calm.
•Follow directions of fire department.
•Know which residents need one-on-one help.
•Know differing abilities of residents.
•Remove blockage from windows or doors.
•Do not use elevators.
4.Identify ways to promote safety and handle nonmedical emergencies
For fire safety, NAs should (cont’d):
•
•Stay low in a room to escape fire.
•Check for heat coming from doors.
•Stop, drop, and roll if clothing catches fire.
•Use damp covering over the mouth and nose.
•Leave building if possible, then move away from it.
4.Identify ways to promote safety and handle nonmedical emergencies
REMEMBER:
Electronic cigarettes (e-cigarettes) are becoming more common. They may be allowed at some facilities. They do not contain tobacco. They contain liquid nicotine that is heated and turned into a vapor. Research on e-cigarettes is ongoing and rules and regulations regarding their use may change.
4.Identify ways to promote safety and handle nonmedical emergencies
Define the following term:
Occupational safety and health administration (OSHA):
a federal government agency that makes rules to protect workers from hazards on the job.
4.Identify ways to promote safety and handle nonmedical emergencies
Remember these points about Safety Data Sheets (SDSs):
•Required by OSHA for all hazardous chemicals
•Detail ingredients, dangers, emergency response, safe handling procedures
•Sometimes accessed by toll-free number
•Must be accessible by all employees
4.Identify ways to promote safety and handle nonmedical emergencies
REMEMBER:
It is very important that NAs know where SDSs are kept at their facilities and know how to use them.
4.Identify ways to promote safety and handle nonmedical emergencies
Think about these questions:
Are there certain natural disasters that are especially likely to occur in your area?
Have you ever experienced this type of disaster?
What did you do?
4.Identify ways to promote safety and handle nonmedical emergencies
The following guidelines are helpful in any type of disaster:
•Listen carefully and follow instructions.
•Remain calm.
•Know where exits and stairways are.
•Know where alarms and extinguishers are.
•Learn appropriate action to take.
•Stay informed via internet, radio, or TV.
5.Demonstrate how to recognize and respond to medical emergencies
●
Define the following term:
conscious
the state of being mentally alert and having awareness of surroundings, sensations, and thoughts.
5.Demonstrate how to recognize and respond to medical emergencies
●
NAs should memorize these steps for responding to a medical emergency:
•Assess the situation. Make sure you are not in danger and note the time.
•Assess the victim. Check the victim’s level of consciousness.
•Call for help or send someone to get help.
•Remain calm and confident.
•Properly document the emergency after it is over.
5.Demonstrate how to recognize and respond to medical emergencies
●
These are signs and symptoms of injury NAs should observe for in an emergency:
•Severe bleeding
•Changes in consciousness
•Irregular breathing
•Unusual color or feel to the skin
•Swollen places on the body
•Medical alert tags
•Anything the resident says is painful
5.Demonstrate how to recognize and respond to medical emergencies
●
Define the following terms:
first aid
emergency care given immediately to an injured person by the first people to respond in an emergency.
cardiopulmonary resuscitation (CPR)
medical procedures used when a person’s heart or lungs have stopped working.
5.Demonstrate how to recognize and respond to medical emergencies
●
REMEMBER:
Not all facilities permit NAs to start CPR, even if they are trained to do so. It is important to know the facility’s policy.
Handout 2-4: CPR Review
This handout is not meant to replace a CPR course. The following is a brief review for people who have had CPR training. It is a procedure to use on adults, not children. This may not be the procedure that your facility uses. Follow your facility’s policies and procedures.
1.After making sure that the scene is safe, check whether the person is responsive. Tap the person on the shoulder and shout, “Are you all right?”
2.If there is no response, call 911 immediately or send someone to call 911. Stay calm.
3.After calling 911, get an automated external defibrillator (AED) (if available and if trained in its use). Return to the person to provide CPR. More information on the AED is in step 10.
4.Look, listen, and feel for signs of life for no longer than 10 seconds:
•Look for the chest to rise and fall.
•Listen for sounds of breathing. Put your ear near the person’s nose and mouth.
•Feel for the person’s breath on your cheek.
Handout 2-4: CPR Review (cont’d)
5.The person should be on his back on a hard surface (if he has no spinal injuries) before CPR is started.
6.Give 30 chest compressions. To give chest compressions, do the following:
•Place the heel of one hand on the sternum (in the center of the person’s chest between the nipples).
•Place the heel of the other hand on top of the positioned hand. Interlace your fingers.
•Position your body directly over your hands. Lock your elbows and shoulders. Look down at your hands.
•Use the heels of your hands to give 30 chest compressions. Push in two inches with each compression. Push hard and fast. Allow the chest to recoil completely after each compression. Do not take your hands off the chest between compressions.
7.Open the airway. Tilt the head back slightly. Lift the chin with one hand while pushing down on the forehead with the other hand to tilt the head back (head tilt-chin lift method). This method is used if a neck injury is not suspected.
Handout 2-4: CPR Review (cont’d)
8.Give two rescue breaths. To give rescue breaths, do the following:
•Pinch the nose to keep air from escaping. Cover the person’s mouth completely with your mouth. You can use a barrier device, such as a special face mask, if available.
•Blow into the person’s mouth slowly, watching for the chest to rise. Blow one breath for about one second, take a “regular” (not a deep) breath, and give a second rescue breath for about one second. Turn your head to the side to listen for air. If the chest does not rise when you give a rescue breath, reopen the airway using the head tilt-chin lift method. Try to give rescue breaths again.
Handout 2-4 CPR Review (cont’d)
9.Continue giving CPR in cycles of 30 compressions to two breaths, with five cycles taking about two minutes. Do not stop CPR to recheck anything. Continue until the scene becomes unsafe, the person recovers, paramedics arrive with an AED and take over, help arrives to assist you, or you become too tired to continue. If you do see signs of life, stop compressions. Maintain an open airway. Turn the person onto his left side, in the recovery position.
Handout 2-4: CPR Review (cont’d)
10.The automated external defibrillator (AED) may be used together with CPR. The AED is a computerized device that checks a person’s heart rhythm. It is able to recognize a rhythm that requires a shock. The AED uses voice prompts, lights, and text messages to relay instructions to the rescuer.
●
When medical help arrives, follow their directions. Assist them as necessary.
5.Demonstrate how to recognize and respond to medical emergencies
●
Define the following terms:
obstructed airway
a condition in which something is blocking the tube through which air enters the lungs.
abdominal thrusts
A method of attempting to remove an object from the airway of someone who is choking.
cyanotic
blue or gray, in reference to skin color.
5.Demonstrate how to recognize and respond to medical emergencies
●
REMEMBER:
A person who is choking usually puts her hands to her throat. As long as a person can speak, breathe, or cough, she should be encouraged to cough as forcefully as possible to get the object out.
Performing abdominal thrusts for the conscious person
1.Stand behind the person and bring your arms under her arms. Wrap your arms around the person’s waist.
2.Make a fist with one hand. Place the flat, thumb side of the fist against the person’s abdomen, above the navel but below the breastbone.
3.Grasp the fist with your other hand. Pull both hands toward you and up, quickly and forcefully.
4.Repeat until the object is pushed out or the person loses consciousness.
5.Report and document the incident properly.
Performing abdominal thrusts for the conscious person
1.Stand behind the person and bring your arms under her arms. Wrap your arms around the person’s waist.
2.Make a fist with one hand. Place the flat, thumb side of the fist against the person’s abdomen, above the navel but below the breastbone.
3.Grasp the fist with your other hand. Pull both hands toward you and up, quickly and forcefully.
4.Repeat until the object is pushed out or the person loses consciousness.
5.Report and document the incident properly.
5.Demonstrate how to recognize and respond to medical emergencies
●
Define the following terms:
shock
a condition that occurs when organs and tissues in the body do not receive an adequate blood supply.
5.Demonstrate how to recognize and respond to medical emergencies
●
The following are signs of shock:
•Pale or cyanotic skin
•Staring
•Increased pulse and respiration
•Low blood pressure
•Extreme thirst
Responding to shock
1.Notify the nurse immediately. Victims of shock should always receive medical care as soon as possible.
2.If you need to control bleeding, put on gloves first. This procedure is described later in the chapter.
3.Have the person lie down on her back. If the person is bleeding from the mouth or vomiting, place her on her left side. Turning the person reduces the risk of choking or aspiration. Elevate the legs 8 to 12 inches unless the person has a head, neck, back, spinal, or abdominal injury; breathing difficulties, or fractures. Elevating the legs allows blood to flow back into the brain (and other vital areas) Never elevate a body part if the person has a broken bone or if it causes pain.
4.Check pulse and respirations if possible (Chapter 7). If the person stops breathing or has no pulse, begin CPR if trained and allowed to do so.
5.Keep the person as calm and comfortable as possible.
6.Maintain normal body temperature. If the weather is cold, place a blanket around the person. If the weather is hot, provide shade.
7.Do not give the person food or liquids.
8.Report and document the incident properly.
5.Demonstrate how to recognize and respond to medical emergencies
●
Define the following terms:
myocardial infarction
a condition that occurs when the heart muscle does not receive enough oxygen because blood flow to the heart is blocked; also called heart attack.
5.Demonstrate how to recognize and respond to medical emergencies
●
The following are signs or symptoms of a myocardial infarction:
•Sudden, severe pain in the chest, usually on the left side or in the center behind the sternum
•Pain or discomfort in other areas of the body, such as the arms, back, neck, jaw, or stomach
•Indigestion or heartburn
•Nausea and vomiting
•Shortness of breath
•Dizziness
5.Demonstrate how to recognize and respond to medical emergencies
●
Signs of an MI (cont’d):
•Skin color that is pale or cyanotic/pale mucous membranes
•Perspiration
•Cold and clammy skin
•Weak and irregular pulse rate
•Low blood pressure
•Anxiety and a sense of doom
•Denial of a heart problem
5.Demonstrate how to recognize and respond to medical emergencies
●
Women may have a heart attack without chest pressure or pain. Common symptoms in women include the following:
•Shortness of breath
•Pressure or pain in the lower chest or abdomen
•Dizziness
•Lightheadedness
•Fainting
•Pressure in the upper back
•Extreme fatigue
•Flu-like symptoms
Responding to a myocardial infarction
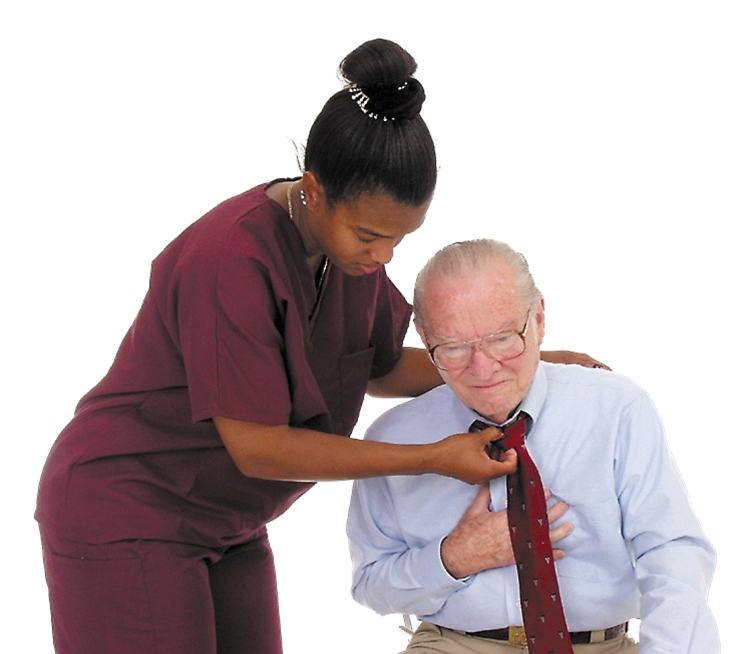
1.Notify the nurse immediately.
2.Place the person in a comfortable position. Encourage him to rest. Reassure him that you will not leave him alone.
3.Loosen clothing around the person’s neck.
4.Do not give the person
food or liquids.
5.Monitor the person’s breathing and pulse. If the person stops breathing or has no pulse, begin CPR if trained and allowed to do so.
6.Stay with the person until help arrives.
7.Report and document the
incident properly.
5.Demonstrate how to recognize and respond to medical emergencies
●
REMEMBER:
Severe bleeding must be controlled immediately, but it is still essential that NAs take time to put on gloves before trying to control bleeding.
Controlling bleeding
1.Notify the nurse immediately.
2.Put on gloves. Take time to do this. If the resident is able, he can hold his bare hand over the wound until you can put on gloves.
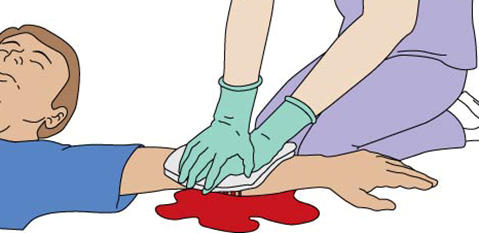
3.Hold a thick sterile pad, clean cloth, or clean towel against the wound.
4.Press down hard directly on the bleeding wound until help arrives. Do not decrease pressure. Put additional pads or cloths over the first pad if blood seeps through. Do not remove the first pad.
Controlling bleeding
5.If you can, raise the wound above the level of the heart to slow the bleeding. Prop up the limb if the wound is on an arm, leg, hand, or foot, and if there are no head, neck, back, spinal, or abdominal injuries; breathing difficulties; or fractures. Use towels or other absorbent material.
6.When bleeding is under control, secure the dressing to keep it in place. Check the person for symptoms of shock (pale skin, increased pulse and respiration rates, low blood pressure, and extreme thirst). Stay with the person until help arrives.
7.Remove and discard gloves. Wash hands thoroughly.
8.Report and document the incident properly.
Handout 2-5: Burns
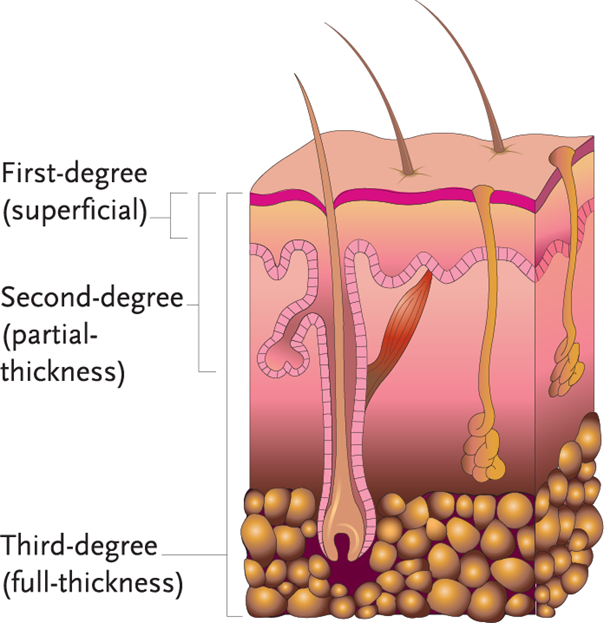
Care of a burn depends on its depth, size, and location. There are three types of burns: first-degree, second-degree, and third-degree burns. First-degree burns involve just the outer layer of skin. The skin becomes red, painful, and swollen, but no blisters occur. Second-degree burns extend from the outer layer of skin to the next deeper layer of skin. The skin is red, painful, and swollen, and blisters appear.
Handout 2-5: Burns (cont’d)
Third-degree burns involve all three layers of the skin and may extend to the bone. If the nerves are destroyed, no pain occurs. The skin is shiny and appears hard. It may be white in color.
Always notify the nurse when a resident is burned. Burns may require emergency help in any of the following situations:
•An elderly, ill, or weak person has been burned, unless burn is very minor.
•The burn occurs on the head, neck, hands, feet, face, or genitals, or burns cover more than one body part.
•The person who has been burned is having trouble breathing.
•The burn was caused by chemicals, electricity, or explosion.
•
Chemical burns require special care. Call for help immediately. The chemical must be washed away thoroughly. A shower or a hose may be needed when the burns cover a large area.
5.Demonstrate how to recognize and respond to medical emergencies
●
REMEMBER:
It is very important to do no harm to severe burns, which could later cause infection or damage to skin that could be saved. Do not put ice, ointment, salve, or grease on any burn.
Treating burns
To treat a minor burn:
●
1.Notify the nurse immediately. Put on gloves.
2.Use cool, clean water to decrease the skin temperature and prevent further injury. Do not use ice or ice water, as ice may cause further skin damage. Dampen a clean cloth with cool water. Place it over the burn.
3.Once the pain has eased, you may cover the area with dry, clean dressing or non-adhesive sterile bandage.
4.Remove and discard gloves. Wash your hands.
5.Never use any kind of ointment, salve, or grease on a burn.
Treating burns
For more serious burns:
●
1.Remove the person from the source of the burn. If clothing has caught fire, have the person stop, drop, and roll, or smother the fire with a blanket or towel to put out flames. Protect yourself from the source of the burn.
2.Notify the nurse immediately. Put on gloves.
3.Check for breathing, pulse, and severe bleeding. If the person is not breathing and has no pulse, begin CPR if trained and allowed to do so.
4.Do not use any type of ointment, water, salve, or grease on the burn.
5.Do not try to pull away any clothing from burned areas. Cover the burn with sterile gauze or a clean sheet. Apply the gauze or sheet lightly. Do not rub the burned area.
Treating burns
6.Do not give the person food or liquids. Monitor vital signs and wait for emergency medical help.
7.Remove and discard your gloves. Wash your hands.
8.Report and document the incident properly.
5.Demonstrate how to recognize and respond to medical emergencies
●
Define the following term:
syncope
loss of consciousness; also called fainting.
5.Demonstrate how to recognize and respond to medical emergencies
●
Signs and symptoms of fainting include the following:
•Dizziness
•Nausea
•Perspiration
•Pale skin
•Weak pulse
•Shallow respirations
•Blackness in visual field
Responding to fainting
1.Notify the nurse immediately.
2.Have the person lie down or sit down before fainting occurs.
3.If the person is in a sitting position, have him bend forward. He can place his head between his knees if he is able. If the person is lying flat on his back, and there are no head, neck, back, spinal, or abdominal injuries; breathing difficulties; or fractures, elevate his legs about 12 inches.
4.Loosen any tight clothing.
5.Have the person stay in position for at least five minutes after symptoms disappear
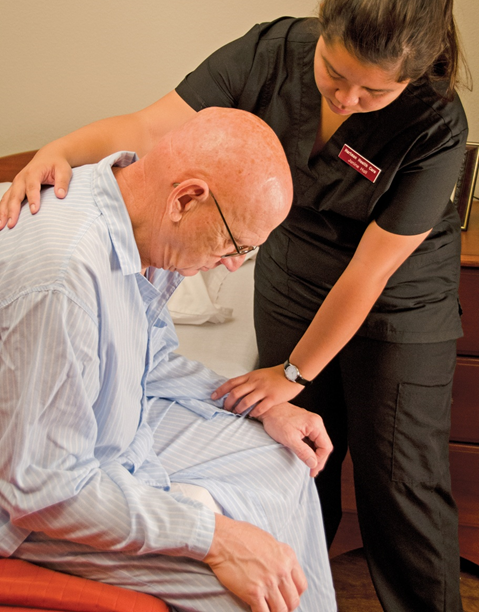
Responding to fainting
6.Help the person get up slowly. Continue to observe him for symptoms of fainting. Stay with him until he feels better. If you need help but cannot leave him, use the call light.
7.If a person does faint, lower him to the floor or other flat surface. Position him on his back. Elevate his legs 12 inches. Loosen any tight clothing. Check to make sure the person is breathing. He should recover quickly, but keep him lying down for several minutes. Report the incident to the nurse immediately. Fainting may be a sign of a more serious medical condition.
8.Report and document the incident properly.
5.Demonstrate how to recognize and respond to medical emergencies
●
Define the following terms:
insulin reaction
A complication of diabetes that can result from either too much insulin or too little food; also known as hypoglycemia.
diabetic ketoacidosis (DKA)
A complication of diabetes that is caused by having too little insulin in the body.
5.Demonstrate how to recognize and respond to medical emergencies
●
Signs and symptoms of insulin reaction include the following:
•Hunger
•Weakness
•Rapid pulse
•Headache
•Low blood pressure
•Perspiration
•Cold, clammy skin
5.Demonstrate how to recognize and respond to medical emergencies
●
Signs and symptoms of insulin reaction (cont’d):
•Confusion
•Trembling
•Nervousness
•Blurred vision
•Numbness of lips and tongue
•Unconsciousness
5.Demonstrate how to recognize and respond to medical emergencies
●
Signs and symptoms of diabetic ketoacidosis include the following:
•Increased hunger
•Increased thirst
•Increased urination
•Abdominal pain
•Deep or labored breathing
•Breath that smells fruity or sweet
•Headache
5.Demonstrate how to recognize and respond to medical emergencies
●
Signs and symptoms of diabetic ketoacidosis (cont’d):
•Weakness
•Rapid, weak pulse
•Low blood pressure
•Dry skin
•Flushed cheeks
•Drowsiness
•Nausea and vomiting
•Air hunger/shortness of breath
•Unconsciousness
5.Demonstrate how to recognize and respond to medical emergencies
●
Seizures are involuntary, often violent, contractions of muscles. They can involve a small area or the entire body. Any of the following may cause a seizure:
•High fever (especially in young children)
•Serious illness (older children and adults)
•Head injury
•Seizure disorder such as epilepsy
5.Demonstrate how to recognize and respond to medical emergencies
●
Signs of seizures include the following:
•Severe shaking
•Thrusting arms and legs uncontrollably
•Jaw clenching
•Drooling
•Inability to swallow
5.Demonstrate how to recognize and respond to medical emergencies
●
REMEMBER:
The primary goal when caring for a resident who is having a seizure is to keep him safe. Do not try to force anything into the mouth of a person who is having a seizure.
Responding to seizures
1.Note the time. Put on gloves. Remove eyeglasses if the person is wearing them.
2.If the person is walking or standing, lower him to the floor. Cradle and protect his head. If a pillow is nearby, place it under his head. Loosen clothing to help with breathing. Try to turn him to one side to help lower the risk of choking. This may not be possible during a violent seizure.
3.Have someone call the nurse immediately or use the call light. Do not leave the person unless you must do so to get medical help.
4.Move furniture away to prevent injury.
5.Do not try to stop the seizure or restrain the person.
6.Do not force anything between the person’s teeth. Do not place your hands in the person’s mouth for any reason. You could be bitten.
7.Do not give the person food or liquids.
Responding to seizures
8.When the seizure is over, note the time. Gently turn the person to his left side unless he has a head, neck, back, spinal, or abdominal injury; breathing difficulties; or fractures. Turning the person reduces the risk of choking on vomit or saliva. If the person begins to choke, get help immediately. Check for adequate breathing and pulse. If the person is not breathing and has no pulse, begin CPR if you are trained and allowed to do so. Do not begin CPR during a seizure.
9.Remove and discard gloves. Wash your hands.
10.Report and document the incident properly, including how long the seizure lasted.
5.Demonstrate how to recognize and respond to medical emergencies
●
Define the following terms:
cerebrovascular accident (CVA)
A condition that occurs when blood supply to a part of the brain is blocked or a blood vessel leaks or ruptures within the brain; also called stroke.
transient Ischemic attack (TIA)
A warning sign of a CVA resulting from a temporary lack of oxygen in the brain; symptoms may last up to 24 hours.
5.Demonstrate how to recognize and respond to medical emergencies
●
Define the following terms:
hemiplegia
paralysis on one side of the body.
hemiparesis
weakness on one side of the body.
expressive aphasia
trouble communicating thoughts through speech or writing.
receptive aphasia
difficulty understanding spoken or written words.
5.Demonstrate how to recognize and respond to medical emergencies
●
The signs that a stroke is occurring include the following:
•Facial numbness, weakness, or drooping, especially on one side
•Paralysis on one side
•Arm numbness or weakness, especially on one side
•Slurred speech or inability to speak
•Inability to understand spoken or written words
•Use of inappropriate words
•Severe headache
•Blurred vision
•Ringing in the ears
5.Demonstrate how to recognize and respond to medical emergencies
●
Signs of stroke (cont’d):
•Redness in the face
•Noisy breathing
•Elevated blood pressure
•Slow pulse rate
•Nausea or vomiting
•Loss of bowel and bladder control
•Seizures
•Dizziness
•Loss of consciousness
5.Demonstrate how to recognize and respond to medical emergencies
●
Women may experience these additional symptoms in the case of stroke:
•Pain in the face, arms, and legs
•Hiccups
•Weakness
•Chest pain
•Shortness of breath
•Palpitations
5.Demonstrate how to recognize and respond to medical emergencies
●
The acronym F.A.S.T. is a good reminder of the signs of stroke and what to do in case of stroke:
•Face: Is one side of the face drooping? Is it numb? Ask the person to smile. Is the smile uneven?
•Arms: Is one arm numb or weak? Ask the person to raise both arms. Check to see if one arm drifts downward.
•Speech: Is the person’s speech slurred? Can the person be understood? Ask the person to repeat a simple sentence and see if the sentence is repeated correctly.
•Time: Time is very important when responding to a stroke. If the person shows any of the symptoms listed above, get help immediately.
5.Demonstrate how to recognize and respond to medical emergencies
●
REMEMBER:
The websites for the American Stroke Association (strokeassociation.org) and the National Stroke Association (stroke.org) have more information.
5.Demonstrate how to recognize and respond to medical emergencies
●
Define the following term:
emesis
the act of vomiting, or ejecting stomach contents through the mouth and/or nose.
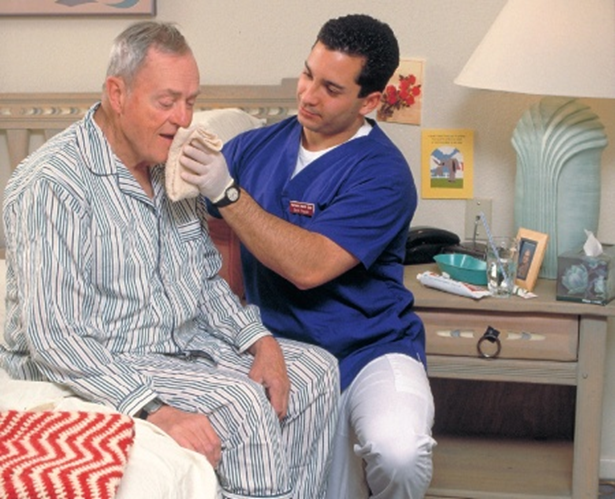
Responding to vomiting
1.Notify the nurse immediately.
2.Put on gloves.
3.Make sure the head is up or turned to one side. If the resident is unconscious, they should be turned on their left side. Place an emesis basin under the chin. Remove it when vomiting has stopped.
4.Remove soiled linens or clothes and set aside. Replace with fresh linens or clothes.
5.If resident’s intake and output (I&O) is being monitored (Chapter 7), measure and note amount of vomitus.
6.Flush vomit down the toilet unless vomit is red, has blood in it, or looks like wet coffee grounds, or has if medication/pills are in vomit. If these signs are observed, show this to the nurse before discarding the vomit. After disposing of vomit, wash, dry, and store basin.
7.Remove and discard gloves.
8.Wash your hands.
9.Put on fresh gloves.
Responding to vomiting
10.Provide comfort to resident. Wipe his face and mouth. Position him comfortably. Offer a drink of water or oral care. It helps get rid of the taste of vomit in the mouth.
11.Put soiled linen in proper containers.
12.Remove and discard gloves.
13.Wash your hands again.
14.Report and document the incident properly. Document time, amount, color, odor, and consistency of vomitus.
Handout 2-6: Nosebleeds
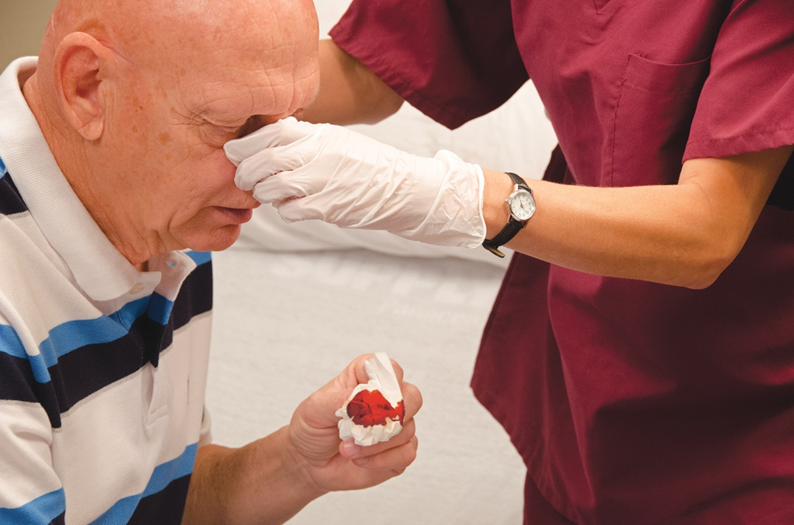
A nosebleed can occur suddenly when the air is dry, when injury has occurred, or when a person has taken certain medications. The medical term for a nosebleed is epistaxis.
Responding to a nosebleed
1.Notify the nurse immediately.
2.Elevate the head of the bed, or tell the person to remain in a sitting position, leaning forward slightly. Offer tissues or a clean cloth to catch the blood. Do not touch blood or bloody clothes, tissues, or cloths without gloves.
Handout 2-6: Nosebleeds
3.Put on gloves. Apply firm pressure on both sides of the nose, on the soft part, up near the bridge. Squeeze the sides with your thumb and forefinger. Have the resident do this until you are able to put on gloves.
Handout 2-6: Nosebleeds
4.Apply pressure until the bleeding stops.
5.Use a cool cloth or ice wrapped in a cloth on the bridge of the nose to slow the flow of blood. Never apply ice directly to skin.
6.Remove and discard gloves. Wash your hands.
7.Report and document the incident properly.
6.Describe and demonstrate infection prevention and control practices
●
Define the following terms:
infection prevention
The set of methods practiced in healthcare facilities to prevent and control the spread of disease.
microorganism (MO)
a living thing or organism that is so small that it can be seen only through a microscope.
infection
The state resulting from pathogens invading the body and multiplying.
6.Describe and demonstrate infection prevention and control practices
●
Define the following terms:
pathogens
microorganisms that are capable of causing infection and disease.
localized infection
an infection that is limited to a specific location in the body and has local symptoms.
systemic infection
An infection that is in the bloodstream and is spread throughout the body, causing general symptoms.
6.Describe and demonstrate infection prevention and control practices
●
Define the following terms:
healthcare-associated infection (HAI)
an infection acquired within a healthcare setting during the delivery of medical care.
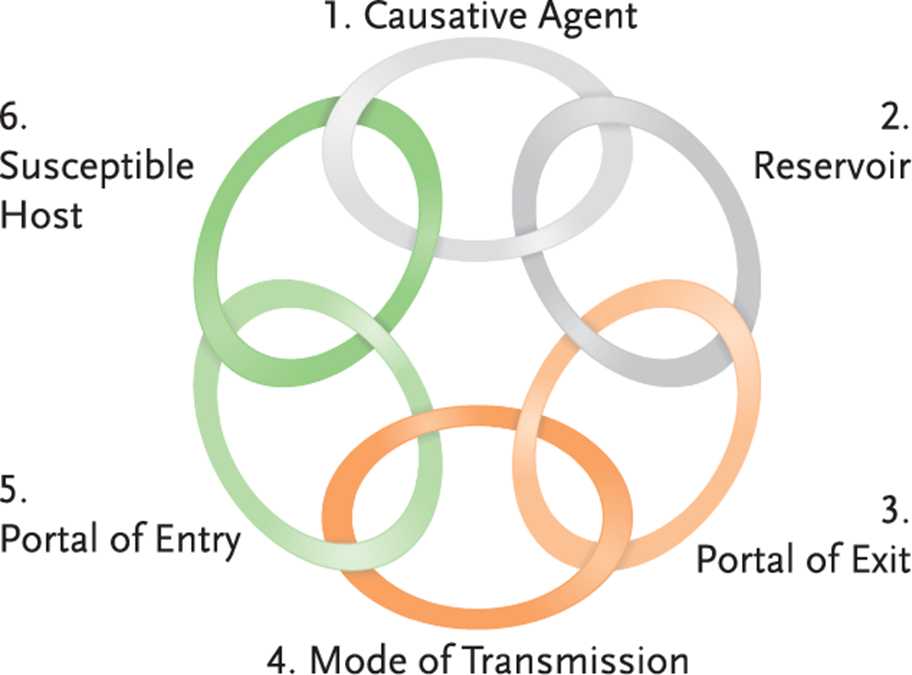
chain of infection
way of describing how disease is transmitted from one human being to another.
causative agent
A pathogenic microorganism that causes disease.
6.Describe and demonstrate infection prevention and control practices
●
Define the following terms:
reservoir
a place where a pathogen lives and multiplies.
portal of exit
any body opening on an infected person that allows pathogens to leave.
mode of transmission
the method of describing how a pathogen travels.
6.Describe and demonstrate infection prevention and control practices
●
Define the following terms:
direct contact
a way of transmitting pathogens through touching the infected person or his or her secretions.
indirect contact
a way of transmitting pathogens by touching something contaminated by the infected person.
portal of entry
any body opening on an uninfected person that allows pathogens to enter.
mucous membranes
The membranes that line body cavities that open to the outside of the body, such as the linings of the mouth, nose, eyes, rectum, or genitals.
6.Describe and demonstrate infection prevention and control practices
●
Define the following terms:
susceptible host
an uninfected person who could get sick.
transmission
passage or transfer.
6.Describe and demonstrate infection prevention and control practices
●
Define the following terms:
infectious
contagious.
medical asepsis
measures used to reduce and prevent the spread of pathogens.
surgical asepsis
the state of being free of all microorganisms; also called sterile technique.
Key Material 2-6: The Chain of Infection
6.Describe and demonstrate infection prevention and control practices
●
Think about this question:
Can you think of an example of each of the six links in the chain of infection?
6.Describe and demonstrate infection prevention and control practices
●
REMEMBER:
If even one of the links in the chain of infection is broken—by washing hands, for example—then the spread of infection is stopped.
Handout 2-7: Infection Prevention Definitions
Microorganism: Microorganisms are single-celled organisms that only can be viewed with the aid of a microscope. Microorganisms can be divided into five basic categories—bacteria, viruses, fungi, protozoa, and helminths. Most microorganisms are harmless—some are even beneficial. Others are capable of causing infection or disease. Microorganisms are often classified as either pathogenic or nonpathogenic.
Nonpathogenic microorganism: A nonpathogenic microorganism is a type of microorganism that is incapable of causing or unable to cause infection or disease.
Pathogenic microorganism: A pathogenic microorganism is a type of microorganism that is capable of causing infection or disease; it is also called a pathogen.
Handout 2-7: Infection Prevention Definitions (cont’d)
Bacteria: Bacteria are single-celled microorganisms that lack nuclei and organized cell structures. Bacteria can exist independently (on their own) or as parasites, dependent upon a host for life. Bacteria can be found in three basic shapes—round, rod, or spiral. While some bacteria are capable of causing disease, most are noninfectious and many have critical roles in decay, fermentation, and nutrient recycling.
Bacteria help people digest food. Some bacteria destroy disease-causing cells, and some produce important vitamins in the gastrointestinal tract. Bacteria also play a role in food processing, such as in the production of yogurt and cheeses.
Pathogenic bacteria can cause cell damage or death by producing substances known as toxins. Other cell damage can occur when the host’s immune system produces substances to eliminate bacteria, and these substances damage the infected cells and adjacent cells.
Handout 2-7: Infection Prevention Definitions (cont’d)
Virus: Viruses are small packages of DNA or RNA encased in protein shells that invade a cell (host cell) and incorporate themselves into the host cell’s DNA. When the infected host cell begins to produce (replicate) new viral particles, the infected cell dies.
Fungi: Fungi are multi-celled or single-celled organisms. They can be pathogenic, causing infections in healthy persons, or opportunistic, causing infections in people with weakened immune systems. Fungi can be nonpathogenic as well, and some types of fungi are even beneficial, such as those used to make antibiotics. A few types of fungi are considered delicacies, such as truffles and edible mushrooms.
Yeasts and molds are examples of fungi. Fungi are the most common causes of disease in crops and plants. Fungi receive their nourishment by secreting enzymes that break down surrounding cells. When this happens on living tissue, it is irritating and uncomfortable.
Handout 2-7: Infection Prevention Definitions (cont’d)
Parasite: A parasite is an organism that lives on or in an organism of a different species.
Infection: An infection occurs when microorganisms enter and multiply within the tissue of a host, causing damage to that tissue. Symptoms may be apparent, or the host may display no symptoms.
Disease: A disease occurs when tissue that has been damaged due to the entry and multiplication of microorganisms results in clinical signs and symptoms of a recognizable process.
Host: A host is an organism or cell on or in which a microorganism lives or feeds.
6.Describe and demonstrate infection prevention and control practices
●
Define the following terms:
Centers For Disease Control And Prevention (CDC)
a federal government agency that issues guidelines to protect the health of individuals and communities.
Standard Precautions
A method of infection prevention in which all blood, body fluids, nonintact skin, and mucous membranes are treated as if they were infected.
sputum
mucus coughed up.
sharps
needles or other sharp objects.
6.Describe and demonstrate infection prevention and control practices
●
CDC defines body fluids to include the following:
•Blood
•Tears
•Saliva
•Sputum (mucus coughed up)
•Urine
•Feces
•Semen
•Vaginal secretions
•Pus or other wound drainage
•Vomit
6.Describe and demonstrate infection prevention and control practices
●
Think about this question:
Why should Standard Precautions be followed on every resident in your care?
6.Describe and demonstrate infection prevention and control practices
●
The following measures are all part of Standard Precautions:
•Wash hands.
•Wear gloves if you may come into contact with blood, body fluids or secretions, broken or open skin, or mucous membranes.
•Remove gloves immediately when finished with a procedure and wash your hands.
•Immediately wash contaminated skin surfaces.
•Wear a disposable gown if you may come into contact with blood or body fluids or when splashing or spraying of blood or body fluids is likely.
6.Describe and demonstrate infection prevention and control practices
●
Standard Precautions (cont’d):
•Wear a mask and goggles and/or a face shield if you may come into contact with blood or body fluids or when splashing or spraying of blood or body fluids is likely.
•Wear gloves when handling sharp objects.
•Never attempt to recap needles or sharps after use.
•Bag all contaminated supplies.
•Clearly label body fluids being saved for a specimen.
•Dispose of contaminated waste properly.
6.Describe and demonstrate infection prevention and control practices
●
Define the following terms:
hand hygiene
washing hands with soap and water and using alcohol-based hand rubs.
6.Describe and demonstrate infection prevention and control practices
●
REMEMBER:
It is very important not to rely only on alcohol-based hand rubs for hand hygiene. Wash hands with antimicrobial soap and water when first arriving at work and any time they are visibly soiled.
6.Describe and demonstrate infection prevention and control practices
●
NAs should wash their hands at these times:
•When first arriving at work
•Whenever hands are visibly soiled
•Before, between, and after all resident contact
•Before putting on gloves and after removing gloves
•After contact with body fluids, mucous membranes, nonintact skin, or wound dressings
6.Describe and demonstrate infection prevention and control practices
●
Times to wash hands (cont’d):
•After handling contaminated items
•After contact with objects in resident’s room
•Before and after touching meal trays or handling food
•Before and after feeding residents
•Before getting clean linen
•Before and after using the toilet
•After touching garbage or trash
•After picking up things from the floor
6.Describe and demonstrate infection prevention and control practices
●
Times to wash hands (cont’d):
•After blowing nose, coughing, or sneezing into hands
•Before and after eating
•After smoking
•After touching areas on the body, such as the mouth, face, eyes, hair, ears, or nose
•Before and after applying makeup
•After any contact with pets/pet care items
•Before leaving facility
6.Describe and demonstrate infection prevention and control practices
●
REMEMBER:
Handwashing is the single most important thing NAs can do to prevent the spread of disease.
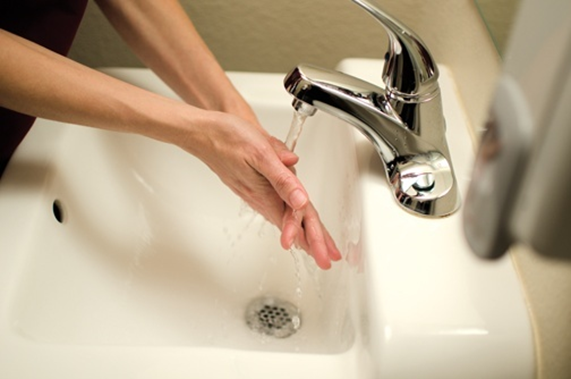
Washing hands (hand hygiene)
Equipment: soap, paper towels
1.Turn on the water at the sink. Keep your clothes dry because moisture breeds bacteria. Do not let your clothing touch the outside portion of the sink or counter.
2.Wet hands and wrists thoroughly.
3.Apply soap to your hands.
4.Keep your hands lower than your elbows and your fingertips down. Rub hands together and fingers between each other to create a lather. Lather all surfaces of wrists, hands, and fingers, using friction for at least 20 seconds.
Lather and friction loosen skin oils and allow pathogens to be rinsed away.
Washing hands (hand hygiene)
5.Clean your fingernails by rubbing them in the palm of your other hand.
Most pathogens on hands are under the nails.
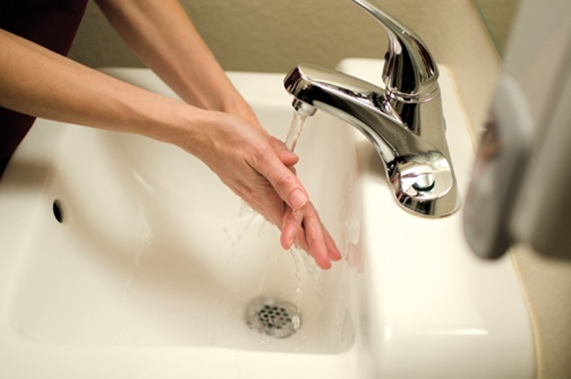
6.Keep your hands lower than your elbows and your fingertips down. Being careful not to touch the sink, rinse thoroughly under running water. Rinse all surfaces of your wrists and hands. Run water down from your wrists to your fingertips. Do not run water over unwashed arms down to clean hands.
Water should run from cleanest to dirtiest. Wrists are cleanest; fingertips are dirtiest.
Washing hands (hand hygiene)
7.Use a clean, dry paper towel to dry all surfaces of your fingers, hands, and wrists, starting at the fingertips. Do not wipe the towel on unwashed forearms and then wipe your clean hands. Discard the towel in the waste container without touching the container. If your hands touch the sink or wastebasket, start over.
8.Use a clean, dry paper towel to turn off the faucet. Discard the towel in the waste container. Do not contaminate your hands by touching the surface of the sink or faucet.
Hands will be recontaminated if you touch the dirty faucet or sink with clean hands.
6.Describe and demonstrate infection prevention and control practices
●
Define the following terms:
personal protective equipment (PPE)
equipment that helps protect employees from serious workplace injuries or illnesses resulting from contact with workplace hazards.
don
to put on.
doff
to remove.
6.Describe and demonstrate infection prevention and control practices
●
Define the following terms:
perineal care
care of the genital and anal area.
nonintact skin
skin that is broken by abrasions, cuts, rashes, acne, pimples, lesions, surgical incisions, or boils.
6.Describe and demonstrate infection prevention and control practices
●
REMEMBER:
PPE must be worn if an NA could come into contact with body fluids, mucous membranes, or open wounds. Gowns, masks, goggles, or face shields must be worn when splashing or spraying of body fluids or blood could occur.
6.Describe and demonstrate infection prevention and control practices
●
Remember these points about gowns:
•They protect exposed skin.
•They prevent soiling of clothing.
•They should fully cover the torso, and the sleeves should fit snugly.
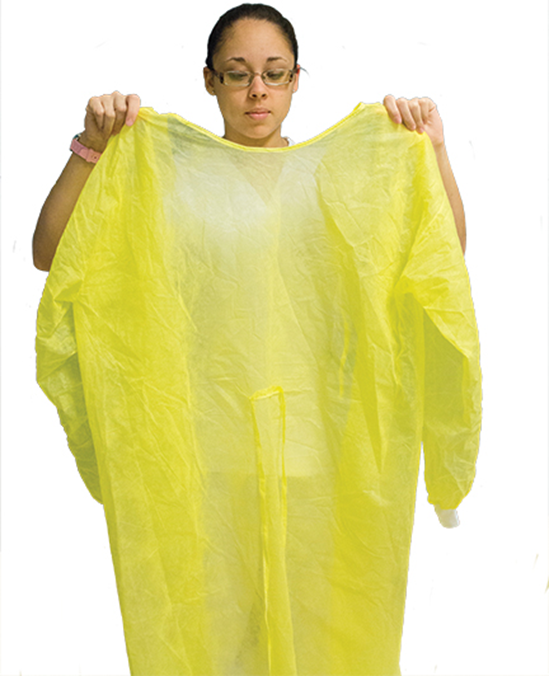
Putting on (donning) and removing (doffing) gown
1.Wash your hands.
2.Open the gown. Hold it out in front of you and allow it to open/unfold. Do not shake it or touch it to the floor. Facing the back opening of the gown, place your arms through each sleeve.
3.Fasten the neck opening.
Putting on (donning) and removing (doffing) gown
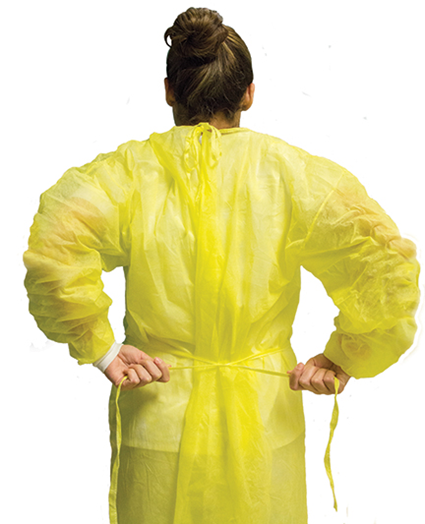
4.Reach behind you. Pull the gown until it completely covers your clothing. Secure the gown at your waist.
Putting on (donning) and removing (doffing) gown
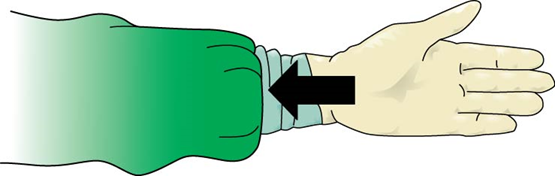
5.Put on your gloves after putting on the gown. The cuffs of the gloves should overlap the cuffs of the gown.
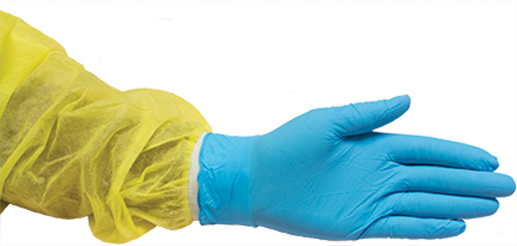
Putting on (donning) and removing (doffing) gown
6.When removing a gown, remove and discard gloves properly (see procedure later in the chapter). Unfasten the gown at the waist and neck. Remove the gown without touching the outside of the gown. Roll the dirty side in, while holding gown away from your body. Discard the gown and wash your hands.
Rolling puts dirtiest surface inward, lessening the risk
of contamination.
6.Describe and demonstrate infection prevention and control practices
●
Remember these points about masks and goggles:
•Masks are worn when the resident has a respiratory illness.
•Masks should fully cover the nose and mouth.
•Masks should fit snugly over nose and mouth.
•It is important to change masks between residents.
•Goggles should fit snugly over and around the eyes or eyeglasses.
•Eyeglasses alone are not a substitute for goggles.
Putting on (donning) mask and goggles
1.Wash your hands.
2.Pick up mask by the top strings or elastic strap. Do not touch mask where it touches your face.
3.Pull the elastic strap over your head, or if mask has strings, tie top strings first, then bottom strings. Do not wear a mask hanging from only the bottom ties or straps.
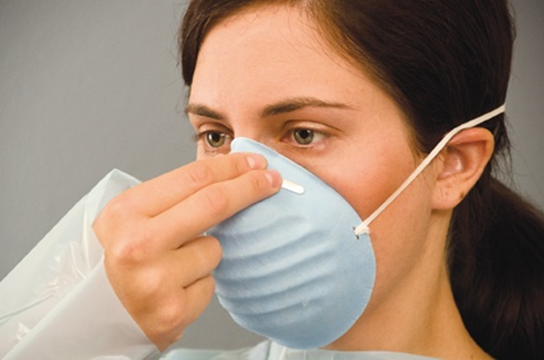
Putting on (donning) mask and goggles
4.Pinch the metal strip at the top of the mask (if part of mask) tightly around your nose so that it feels snug. Fit the mask snugly around your face and below the chin.
5.Place the goggles over your eyes or eyeglasses. Use the headband to secure them to your head. Make sure they are on snugly.
6.Put on gloves after putting on mask and goggles.
6.Describe and demonstrate infection prevention and control practices
●
Gloves should be worn in all of the following situations:
•If you might come into contact with blood or any body fluid, open wounds, or mucous membranes
•During mouth care or care of any mucous membrane
•During perineal care
•When providing personal care on nonintact skin
•When providing personal care if NA has cuts or sores on her hands
•When shaving a resident
•When disposing of soiled linens, gowns, dressings, and pads
•When touching contaminated surfaces or equipment
6.Describe and demonstrate infection prevention and control practices
●
Gloves should be changed
•If gloves become soiled, torn, or damaged
•Immediately before contact with mucous membranes or broken skin
Putting on (donning) gloves
1.Wash your hands.
2.If you are right-handed, slide one glove on your left hand (reverse if left-handed).
3.Using your gloved hand, slide the other hand into the second glove.
4.Interlace your fingers. Smooth out folds and create a comfortable fit.
5.Carefully look for tears, holes, or spots. Replace the glove if needed.
6.Adjust the gloves until they are pulled up over your wrists.
6.Describe and demonstrate infection prevention and control practices
●
Gloves should be removed
•After use
•Before caring for another resident
•Before touching non-contaminated items or surfaces
Removing (doffing) gloves
1.Touch only the outside of one glove. With one gloved hand, grasp the other glove at the palm and pull the glove off.
2.With the fingertips of your gloved hand, hold the glove you just removed. With your ungloved hand, slip two fingers underneath cuff of the remaining glove at wrist. Do not touch any part of the outside of glove.
The outside of the glove is contaminated.
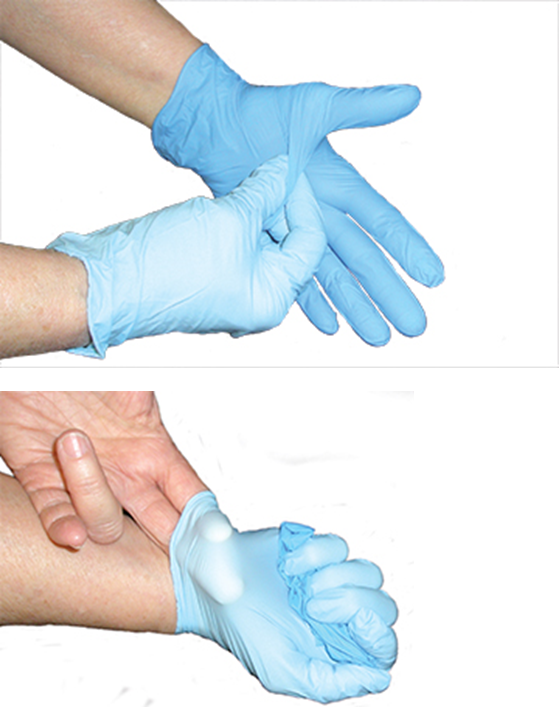
Removing (doffing) gloves
3.Pull down, turning this glove inside out and over the first glove as you remove it.
4.You should now be holding one glove from its clean inner side. The other glove should be inside it.
5.Drop both gloves into the proper container without contaminating yourself.
6.Wash your hands.
6.Describe and demonstrate infection prevention and control practices
●
Order for donning full set of PPE:
•Wash hands
•Put on gown
•Put on mask
•Put on goggles/face shield
•Put on gloves
Order for doffing full set of PPE:
•Remove gloves
•Remove goggles/face shield
•Remove gown
•Remove mask
•Wash hands
6.Describe and demonstrate infection prevention and control practices
●
Define the following terms:
clean
in health care, a condition in which objects have not been contaminated with pathogens.
dirty
in health care, a condition in which objects have been contaminated with pathogens.
sterilization
a cleaning measure that destroys all microorganisms, including pathogens.
6.Describe and demonstrate infection prevention and control practices
●
Define the following terms:
disinfection
process that destroys most, but not all pathogens; it reduces the pathogen count to a level that is considered not infectious.
disposable
Only to be used once and then discarded.
6.Describe and demonstrate infection prevention and control practices
●
The following are guidelines for equipment, linen, and clothing:
•Prevent skin/mucous membrane contact.
•Prevent contamination of clothing.
•Prevent transfer of disease to other residents or environments.
•Do not use reusable equipment until it has been cleaned properly.
•Dispose of all single-use equipment properly.
6.Describe and demonstrate infection prevention and control practices
●
Guidelines for equipment, linen, and clothing (cont’d):
•Clean and disinfect all environmental surfaces, beds, bedrails, bedside equipment, and all frequently touched surfaces (doorknobs and call lights are good examples).
•Handle, transport, and process soiled linens and clothing in a way that prevents skin and mucous membrane exposure, contamination of clothing (hold linen away from uniform), and transfer of disease to other residents and environments.
•Bag soiled linen at point of origin.
•Sort soiled linen away from resident care areas.
•Place wet linen in leakproof bags.
6.Describe and demonstrate infection prevention and control practices
●
It is important to follow these guidelines for cleaning spills involving blood, body fluids, or glass:
•Don proper gloves.
•Use proper product to absorb spill.
•Scoop up absorbed spill and dispose of it in designated container.
•Apply disinfectant.
•Use proper cleaning solution.
•Use tools, never hands, to pick up glass.
•Properly bag waste.
6.Describe and demonstrate infection prevention and control practices
●
REMEMBER:
Spills should be absorbed and removed without placing disinfectant directly on the fluid.
6.Describe and demonstrate infection prevention and control practices
●
Define the following term:
Transmission-Based Precautions
method of infection prevention used when caring for persons who are infected or may be infected with a disease.
6.Describe and demonstrate infection prevention and control practices
●
REMEMBER:
Transmission-Based Precautions are always used in addition to Standard Precautions.
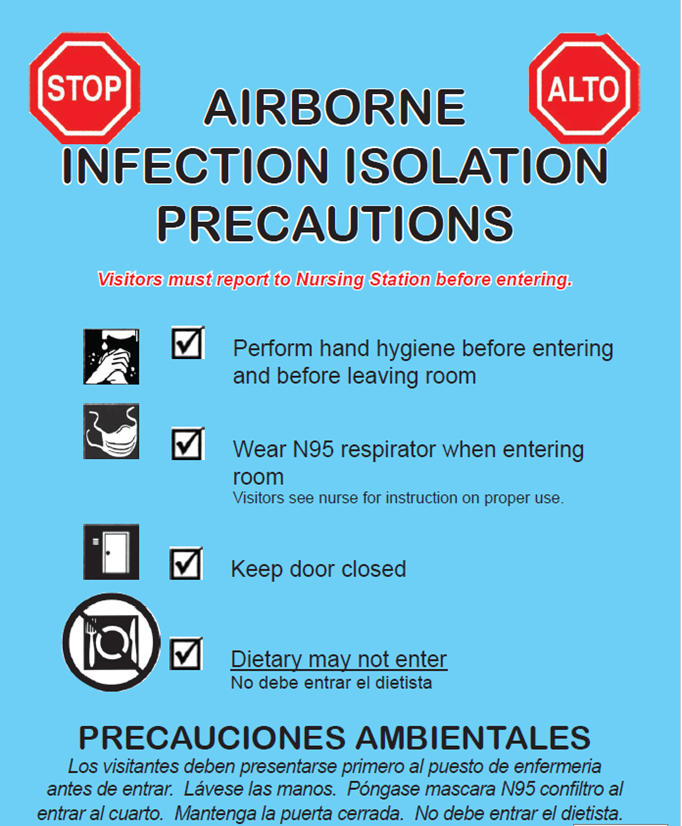
Key Material 2-7: Airborne Diseases
6.Describe and demonstrate infection prevention and control practices
●
Remember these facts about airborne diseases:
•Transmitted through the air after being expelled
•Can remain floating for some time
•Examples include tuberculosis (TB), measles, and chickenpox
•Precautions include:
•Face mask
•Gown
•Handwashing
•Proper ventilation
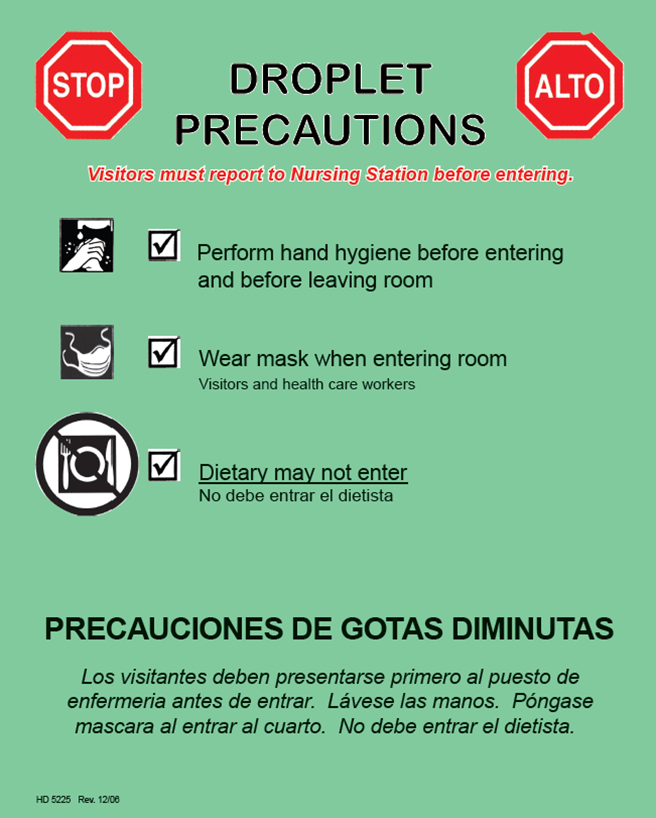
Key Material 2-8: Droplet Diseases
6.Describe and demonstrate infection prevention and control practices
●
Remember these facts about droplet diseases:
•Can be spread by coughing, sneezing, talking, laughing, or suctioning
•Influenza is one example.
•Precautions include:
•Face mask
•Covering nose and mouth when sneezing or coughing
•Handwashing
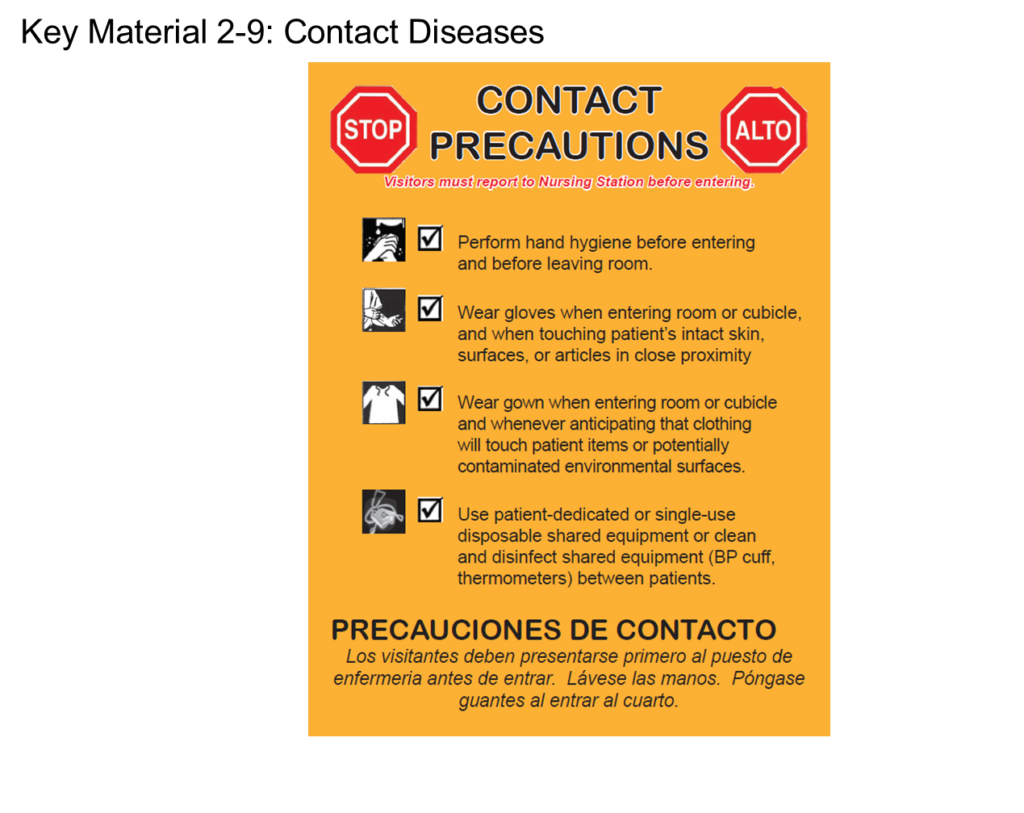
Key Material 2-9: Contact Diseases
6.Describe and demonstrate infection prevention and control practices
●
Remember these facts about contact diseases:
•Spread by touching skin, wound, or infection
•Examples include conjunctivitis (pink eye), C. diff., lice, scabies
•Precautions include:
•Handwashing with antimicrobial soap
•Not touching infected surfaces without gloves
•Not touching uninfected surfaces with contaminated gloves
•Not sharing towels, linens, or clothing
•Using disposable equipment when possible
6.Describe and demonstrate infection prevention and control practices
●
Guidelines for isolation include the following:
•Transmission-Based Precautions are always used in addition to Standard Precautions.
•Use PPE as instructed. Do not wear PPE outside resident’s room and perform hand hygiene following removal of PPE.
•Do not share equipment between residents.
•Wear proper PPE when serving food and drink.
•Follow Standard Precautions in dealing with body waste removal.
•Wear proper PPE if required to take specimen.
•Reassure residents and allow time for them to talk about their concerns.
6.Describe and demonstrate infection prevention and control practices
●
Define the following terms:
bloodborne pathogens
microorganisms found in human blood, body fluid, draining wounds, and mucous membranes that can cause infection and disease in humans.
hepatitis
inflammation of the liver caused by certain viruses and other factors, such as alcohol abuse, some medications, and trauma.
tuberculosis (TB)
a highly contagious lung disease caused by a bacterium that is carried on mucous droplets suspended in the air; usually affects the lungs and causes coughing, trouble breathing, weight loss, and fatigue.
6.Describe and demonstrate infection prevention and control practices
●
Define the following terms:
COVID-19 (coronavirus disease)
a droplet and airborne disease transmitted through droplets and particles produced by an infected person; often characterized by respiratory symptoms and capable of progressing to severe symptoms, even death, especially in people who are older, have underlying health conditions, or are unvaccinated.
MRSA (methicillin-resistant Staphylococcus aureus )
bacteria (Staphylococcus aureus) that have developed resistance to many antibiotics..
VRE (vancomycin-resistant Enterococcus )
bacteria (enterococci) that have developed resistance to the antibiotic vancomycin.
Clostridioides difficile (C. diff, C. difficile)
a bacterium that is spread by spores in feces that are difficult to kill; it causes symptoms such as diarrhea and nausea and can lead to serious inflammation of the colon (colitis).
6.Describe and demonstrate infection prevention and control practices
●
Bloodborne diseases can be spread in these ways:
•Contact with infected blood
•Contact with infected semen or vaginal secretions contacting mucous membranes
•Sexual contact with an infected person
•Sharing needles with an infected person
•From infected mothers to their babies
•Contact with infected blood or certain other body fluids in healthcare setting
6.Describe and demonstrate infection prevention and control practices
●
REMEMBER:
Standard Precautions, handwashing, isolation, and use of PPE can all help prevent the spread of bloodborne diseases.
6.Describe and demonstrate infection prevention and control practices
●
There are two common types of hepatitis:
•Hepatitis B is transmitted through sexual contact, by sharing infected needles, from a mother to her baby during delivery, through improperly sterilized needles used for tattoos and piercings, through grooming supplies such as razors, by exposure to infected needles or other sharps, or from splashing blood. There is a vaccine for HBV.
•Hepatitis C is transmitted through blood or body fluids.
6.Describe and demonstrate infection prevention and control practices
●
REMEMBER:
Employers must offer NAs a free vaccine to protect them from hepatitis B. NAs should take the vaccine when it is offered.
6.Describe and demonstrate infection prevention and control practices
●
It is important to follow these guidelines when a resident has TB:
•Follow Standard Precautions and Airborne Precautions.
•Wear PPE as instructed.
•Handle sputum or phlegm carefully.
•Ensure proper ventilation.
•If resident is in AIIR isolation room, open and close the door slowly.
•Follow isolation procedures if ordered.
•Help resident remember to take medications.
6.Describe and demonstrate infection prevention and control practices
●
It is important to follow these guidelines when a resident has COVID-19:
•Follow Standard Precautions and Transmission-Based Precautions.
•Measure vital signs as ordered, report changes.
•Wear the proper mask mask—usually an N95 or other respirator—that covers your nose and mouth when caring for the resident.
•Residents who test positive may be asked to stay in their rooms, maintain a distance of 6 feet when possible, close residents’ doors.
•Residents may be placed in a special airborne infection isolation room (AIIR). These rooms have a controlled flow of air. Keep doors closed and do not open or close door quickly.
•Use disposable supplies when possible
6.Describe and demonstrate infection prevention and control practices
●
Guidelines for a resident who has COVID-19 (cont’d):
•Do not share personal items among residents
•Wash hands often or use hand sanitizer
•Encourage the resident who has COVID-19 to wear a mask when she is near other people.
•Clean frequently –touched surfaces with facility-approved supplies.
•Encourage rest and fluids
•Do not touch your eyes, nose, or mouth
•Do not go to work if you feel sick or have a fever, follow facility policy regarding masking, testing, and when to return to work.
6.Describe and demonstrate infection prevention and control practices
●
Guidelines for a resident who has COVID-19 (cont’d):
•Report any signs and symptoms the illness is worsening
•Difficulty breathing
•Persistent pain or pressure in chest
•Confusion
•Difficulty waking or remaining alert
•Prolonged elevated temperature
•Bluish, gray, or unusually light lips or face
6.Describe and demonstrate infection prevention and control practices
●
There are two different types of MRSA:
•Hospital-associated MRSA (HA-MRSA)
•Community-associated MRSA (CA-MRSA)
6.Describe and demonstrate infection prevention and control practices
●
MRSA can be spread by
•Direct contact
•Indirect contact
6.Describe and demonstrate infection prevention and control practices
●
REMEMBER:
Proper handwashing is the single most important measure to control the spread of MRSA.
6.Describe and demonstrate infection prevention and control practices
●
VRE is spread by
•Direct contact
•Indirect contact
6.Describe and demonstrate infection prevention and control practices
●
REMEMBER:
Prevention of VRE is very important. Proper handwashing is an important part of prevention.
6.Describe and demonstrate infection prevention and control practices
●
C. difficile is spread
•By spores via direct contact
•When intestinal flora is altered due to enemas, nasogastric tubes, GI tract surgery, and overuse of antibiotics
6.Describe and demonstrate infection prevention and control practices
●
REMEMBER:
Proper handwashing and proper handling of wastes can help prevent C. diff. Hand sanitizers are not effective in preventing the spread of this disease. Soap and water must be used each time hand hygiene is performed.
6.Describe and demonstrate infection prevention and control practices
●
The following are employers’ responsibilities regarding infection prevention:
•Establish procedures and exposure control plan.
•Provide in-service education.
•Have written procedures for exposures.
•Provide proper PPE.
•Provide HBV vaccination.
6.Describe and demonstrate infection prevention and control practices
●
The following are employees’ responsibilities regarding infection prevention:
•Follow Standard Precautions.
•Follow facility’s policies and procedures.
•Follow care plans and assignments.
•Use PPE.
•Take advantage of free hepatitis B vaccine.
•Report any exposure immediately.
•Participate in education programs.